| September 21, 2026
 South Africa's #1 Mobile Protection Brand
Of the three controls that decide how a photograph looks, shutter speed is the one worth learning first. Aperture and ISO affect brightness and, in aperture's case, how much of the scene stays sharp. Shutter speed does all of that and one thing more: it decides what movement looks like. The same scene at 1/2000 sec and at half a second produces two completely different photographs — one a frozen instant the eye could never have held, the other a smear of motion that no single moment contains. This guide covers what shutter speed is, how it interacts with everything else, and the settings that work for ten specific subjects.
What shutter speed means
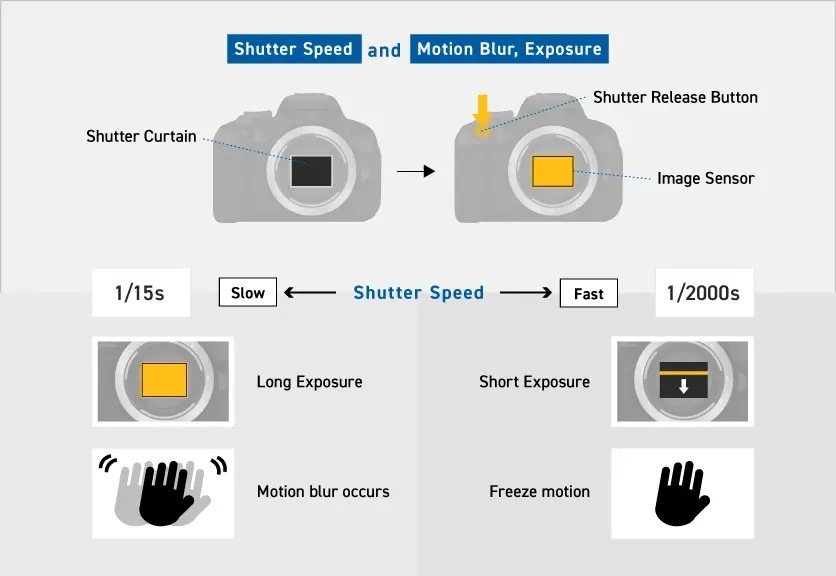
Shutter speed is simply how long the shutter stays open, and therefore how long the sensor is collecting light. Nothing is recorded before it opens or after it closes. You will also see it called exposure time in camera menus and specification sheets, which is the more literal description of the same thing.
It is written either as a whole number of seconds or as a fraction: 30 seconds, 1 second, 1/60, 1/125, 1/1000. The fractions cause most of the early confusion, because a bigger number means a shorter time. 1/1000 sec is a thousandth of a second, which is far briefer — and therefore far "faster" — than 1/60. When someone says they have increased their shutter speed, they mean the denominator has gone up and the shutter is open for less time.
How shutter speed relates to exposure
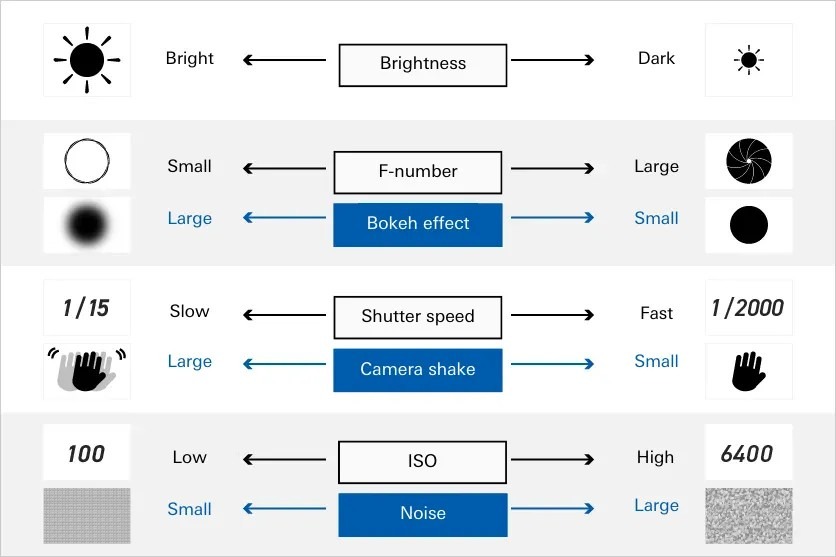
Exposure is the total amount of light the sensor receives, and it is what makes a photograph bright or dark. Three settings control it together: the f-number, the shutter speed and the ISO sensitivity. Our guide to aperture and f-numbers covers the first of those in detail.
Shutter speed's contribution is the simplest of the three to understand. A fast shutter gives the sensor less time to collect light, so the image comes out darker. A slow shutter gives it more, so the image comes out brighter.
The consequence is that you cannot change shutter speed in isolation. Deciding to freeze a moving subject at 1/2000 sec is also deciding to cut the light reaching the sensor dramatically, and something has to compensate — a wider aperture, a higher ISO, or both. This is why the three controls are usually described as a triangle: move one and at least one other has to move with it.
Every interchangeable-lens camera offers a set of shooting modes, and shutter priority is the one built around this setting. It appears as S on most cameras and Tv (for time value) on others.
In shutter priority you choose the shutter speed and the camera selects an aperture to match. It is the right mode whenever the shutter speed is the thing you cannot compromise on — a bird in flight, a cricket delivery, a runner crossing the line — because it guarantees you get the speed you asked for and lets the camera solve the rest.
One important qualification, because it is commonly misunderstood. Shutter priority sets the aperture automatically. It does not automatically raise ISO unless you have separately switched Auto ISO on. If your ISO is fixed at 100 and you select 1/4000 sec in fading light, the camera will open the aperture as wide as the lens allows and then simply give you an underexposed frame, because it has nothing left to adjust. For action work in changing light, turn Auto ISO on as well and set a ceiling you are comfortable with.
Changing the setting itself is usually a matter of turning the main control dial with the mode set to S or Tv. In manual mode, one dial adjusts shutter speed and another adjusts aperture — which is which varies by camera, and it is worth finding out before you need it rather than during.
Freezing movement with a fast shutter speed
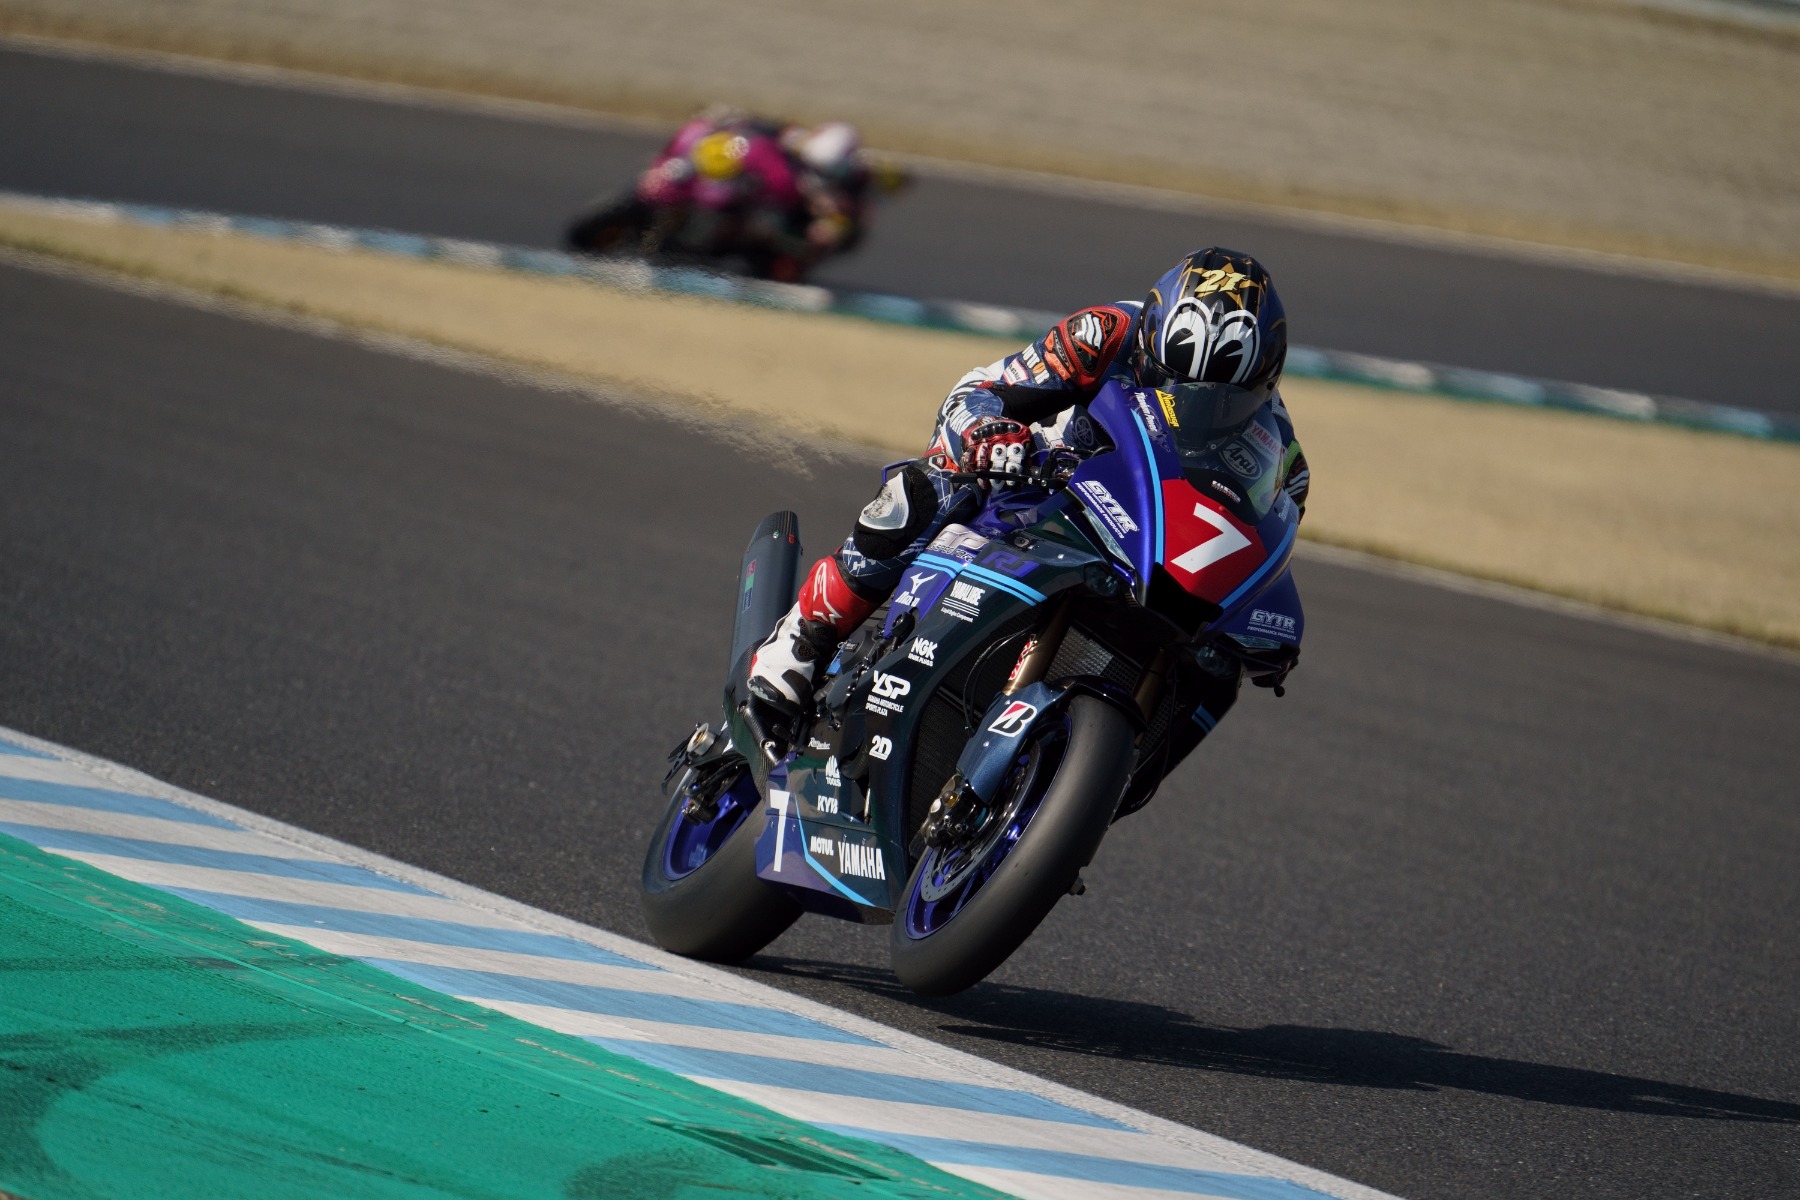
TAMRON 150-500mm F5-6.7 (Model A057) Focal length: 500mm Exposure: F6.7 Shutter Speed: 1/3200sec ISO: 640
Fast shutter speeds — 1/500, 1/1000 and beyond — arrest motion. The subject is captured in a slice of time short enough that it has not meaningfully moved during the exposure, so everything renders sharply.
Past about 1/1000 sec you move into territory the eye cannot follow. Water breaking into individual droplets, a bird's wing at full extension, the precise moment a ball deforms against a bat — none of these are things you can see happening, and all of them are things a fast shutter will hold. The sports and bird sections below give specific figures.
The cost is light. At 1/4000 sec the sensor receives a sixteenth of what it would get at 1/250, which is why fast shutter work is straightforward in bright sun and difficult everywhere else. In poor light you will be trading ISO for shutter speed constantly, and knowing how far you are prepared to push ISO is half of shooting action well.
Using a slow shutter speed for movement
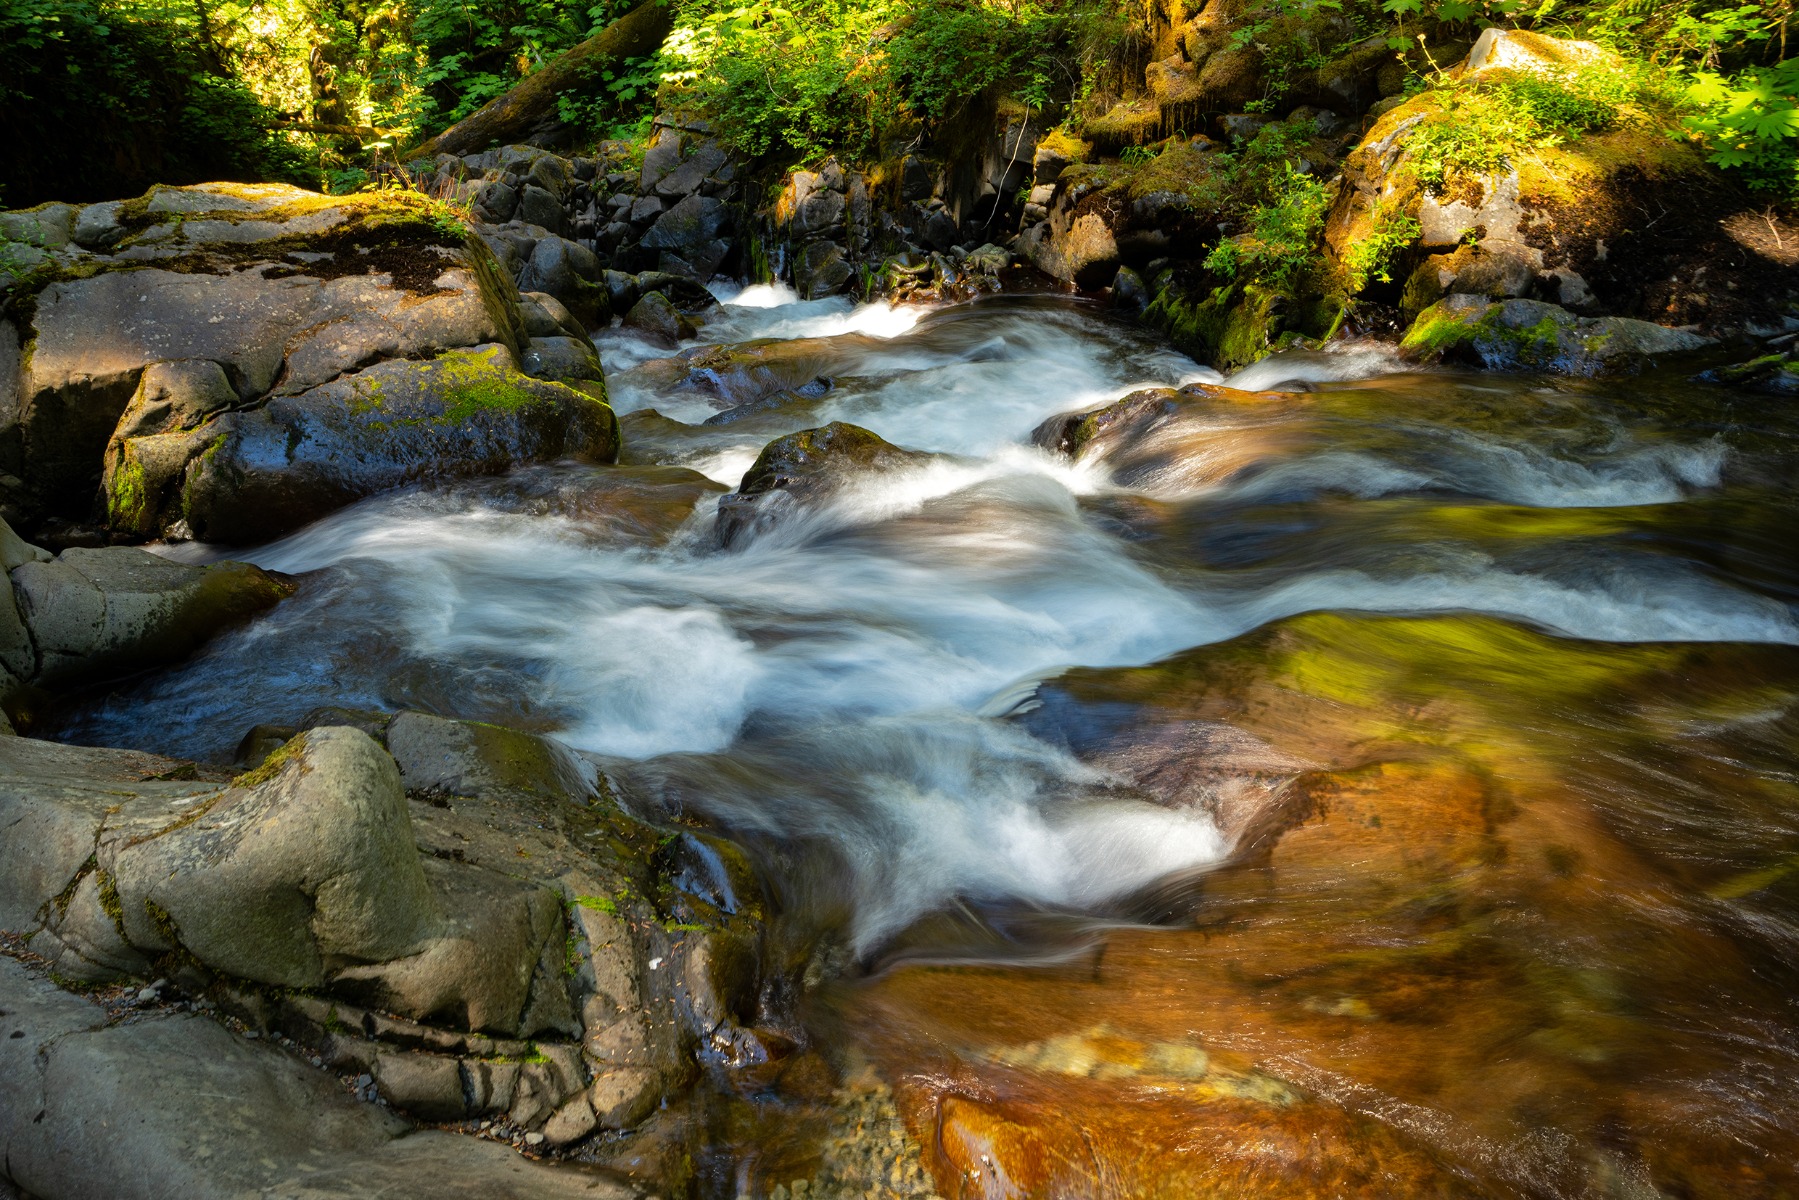
TAMRON 17-50mm F4 (Model A068) Focal length: 28mm Exposure: F20 Shutter Speed: 1/3sec ISO: 200
A slow shutter speed holds the shutter open for a long time — a second, ten seconds, sometimes far longer. Two quite different reasons to do it.
The first is practical: when there is very little light, a long exposure is how you gather enough of it. Night scenes, star fields and dim interiors all depend on this, and there is frequently no alternative.
The second is creative. Anything that moves during a long exposure records as blur rather than as a shape, and that blur is often the point. Falling water turns to silk. Car lights become continuous ribbons. People walking through a frame dissolve into ghosts or vanish entirely. The waterfall and light trails sections below cover both in detail.
What a slow shutter cannot tolerate is camera movement. Anything beyond roughly a thirtieth of a second handheld will record your own unsteadiness along with the subject's motion, so a tripod is effectively compulsory rather than merely advisable.
There is a well-known guideline for handheld shooting: keep your shutter speed at or above one over the focal length. A 50mm lens wants 1/50 sec or faster; a 200mm lens wants 1/200 sec or faster. The logic is that a longer lens magnifies your own movement along with the subject, so it needs a briefer exposure to stay sharp.
Two things the rule leaves out, both of which matter.
It assumes a full-frame sensor. On an APS-C body the effective focal length is roughly 1.5 times longer, and your hand movement is magnified accordingly. A 50mm lens on APS-C frames like 75mm, so it wants about 1/75 sec rather than 1/50 — and a 200mm lens wants closer to 1/300. Applied without this adjustment, the rule will hand you soft images and no obvious explanation for them.
It assumes no stabilisation. In-lens stabilisation actively counteracts hand movement and buys back several stops below the reciprocal figure. Tamron's system is branded VC. With effective stabilisation, a 180mm lens at 1/30 sec is entirely achievable, which is four stops past what the rule permits — and that is the difference between getting the shot in fading light and not getting it.
Treat the reciprocal as a starting point rather than a law. Take a test frame, magnify it on the rear screen, and adjust. And when the light is genuinely poor, or when you are choosing a slow shutter deliberately, use a tripod rather than trying to out-steady physics.
Shutter speed depends on what is moving, how fast, and what you want the movement to look like. Below are ten common subjects with working figures for each. They are starting points rather than rules — the light, the lens and the effect you are after will all move them.
Panning appears in two of the sections below as an alternative approach; the technique itself is explained in full under its own heading further down.
Freezing movement at a school athletics meeting

TAMRON 50-300mm F4.5-6.3 (Model A069) Focal length: 50mm Exposure: F4.5 Shutter Speed: 1/1000sec ISO: 200
A school athletics meeting or an inter-house sports day is where a great many people first try to photograph fast movement, usually from the stands with their own child somewhere in the middle distance.
To freeze a sprinter mid-stride, a long jumper at take-off or a relay handover, work between 1/500 and 1/1000 sec. The faster end of that range is safer for sprint finishes and anything involving a jump, where the limbs are moving considerably faster than the athlete as a whole.
Field events are more forgiving. A high jumper at the top of the arc is momentarily almost still, and shot put or discus has a slower build than a sprint. You can drop toward 1/500 and gain a stop of light.
For a more evocative result, panning at around 1/60 to 1/125 sec lets you keep the runner sharp while the background streaks behind them. It is harder, and most attempts fail, but the ones that work are considerably more interesting than another frozen frame.
Portrait at a moderate shutter speed

TAMRON 90mm F2.8 MACRO (Model F072) Focal length: 90mm Exposure: F3 Shutter Speed: 1/80sec ISO: 500
People are not still, even when they are trying to be. They breathe, blink, shift their weight and adjust their expression constantly, so portraits need enough shutter speed to hold all of that.
1/60 to 1/125 sec covers most situations. It is fast enough for a seated or standing subject and slow enough to keep ISO reasonable indoors.
Raise it to around 1/250 sec when there is more movement to contend with — a subject walking toward you, a child who will not settle, or simply a windy day, since hair moving across a face at 1/60 will smear.
Indoors or in deep shade, you may not be able to hold even 1/60 at a usable aperture. Raise ISO before you drop below it, because noise is recoverable in a way that motion blur is not. Our portrait photography guide covers exposure for portraits in more depth.
Long exposure night scene
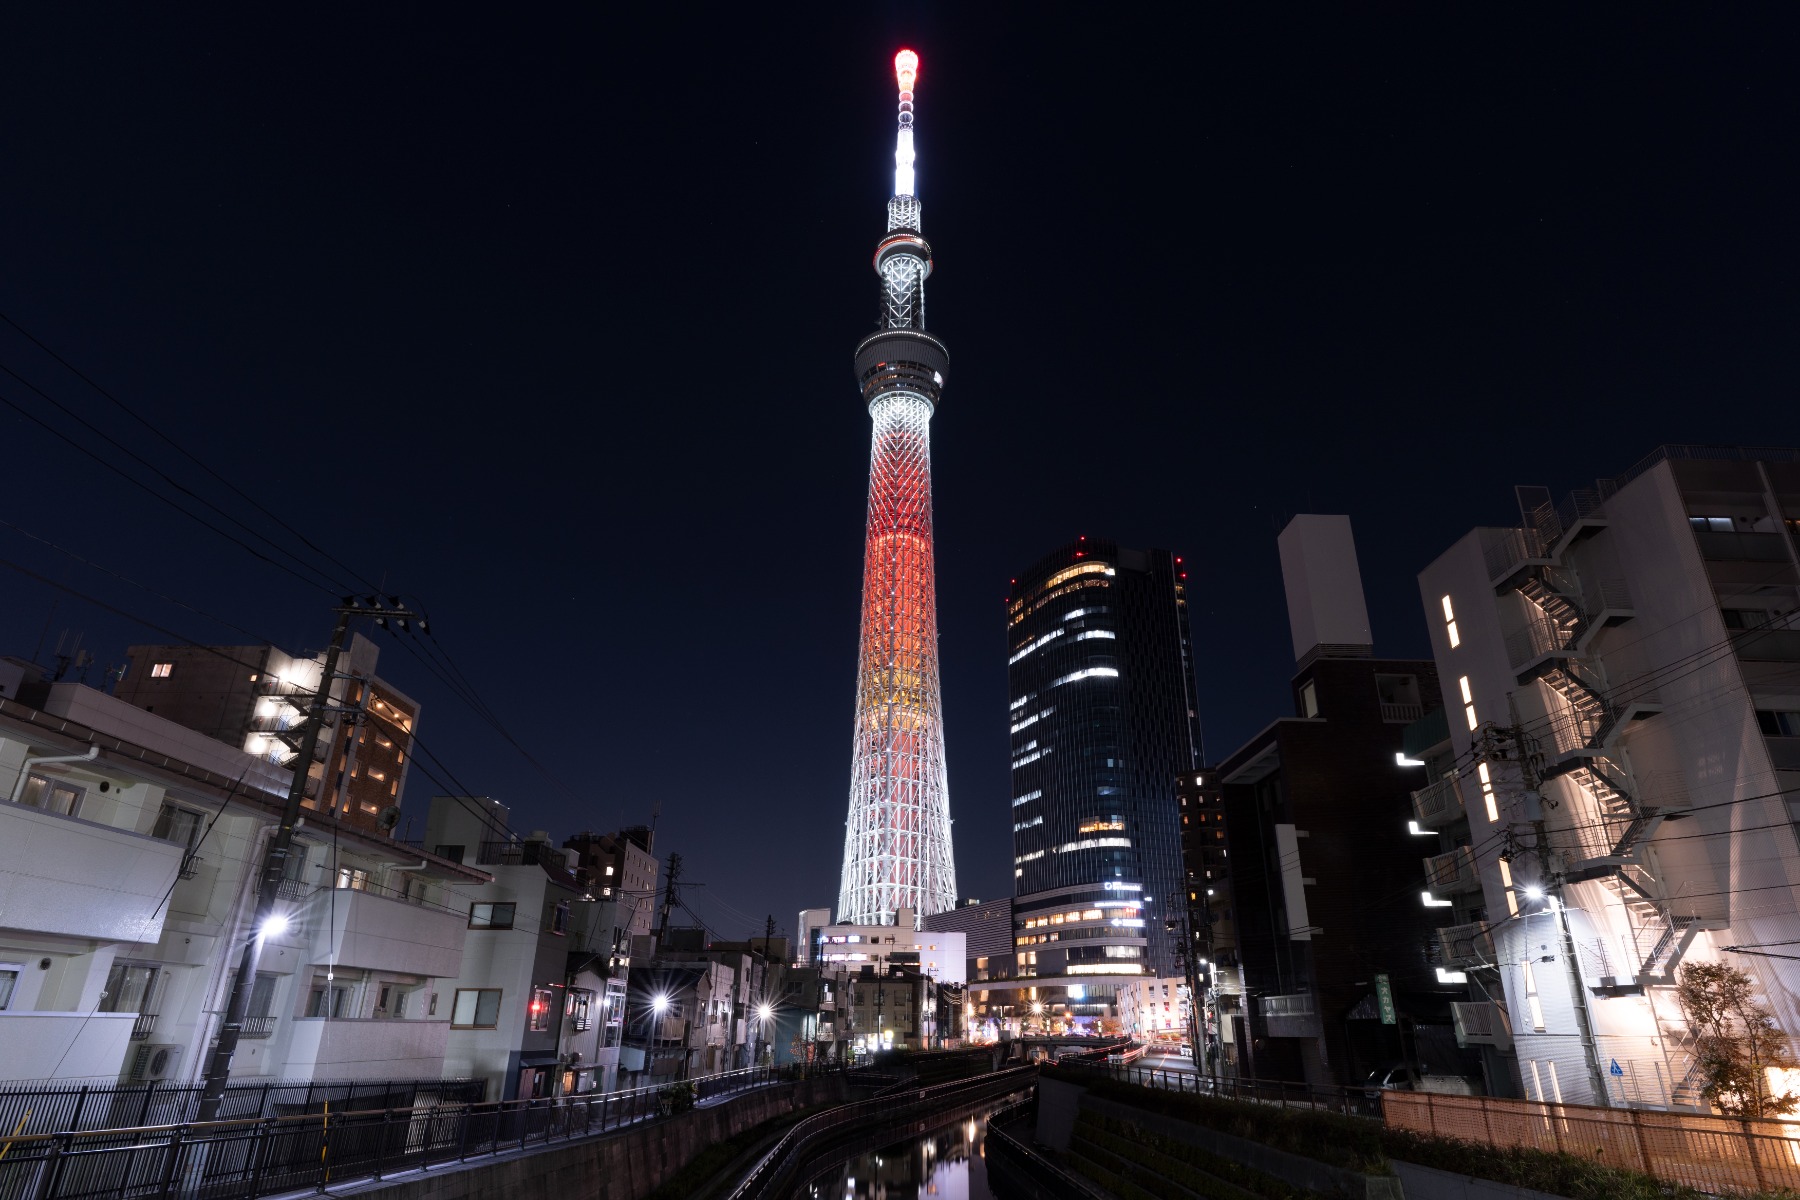
TAMRON 20-40mm F2.8 (Model A062) Focal length: 20mm Exposure: F11 Shutter Speed: 13sec ISO: 200
Night cityscapes are long-exposure work by default. With a tripod, anything from a few seconds to about 30 seconds produces clean, richly graded images where building lights and streetlights hold their colour instead of blowing out.
The Cape Town city bowl and Foreshore, inner-city and northern Johannesburg, and the Durban beachfront promenade all reward this treatment, and each gives a different mix of light sources.
Tripods are not always straightforward, though, and the reason is usually permission rather than space. Many vantage points sit on private or commercial property, and municipal film permit offices handle applications for setting up on public ground — requirements differ by city, so check in advance rather than after someone asks you to pack up.
Handheld, aim for 1/15 to 1/60 sec and raise ISO to compensate. Brace against a wall or railing, and let stabilisation do the rest.
Fast shutter speed for birds
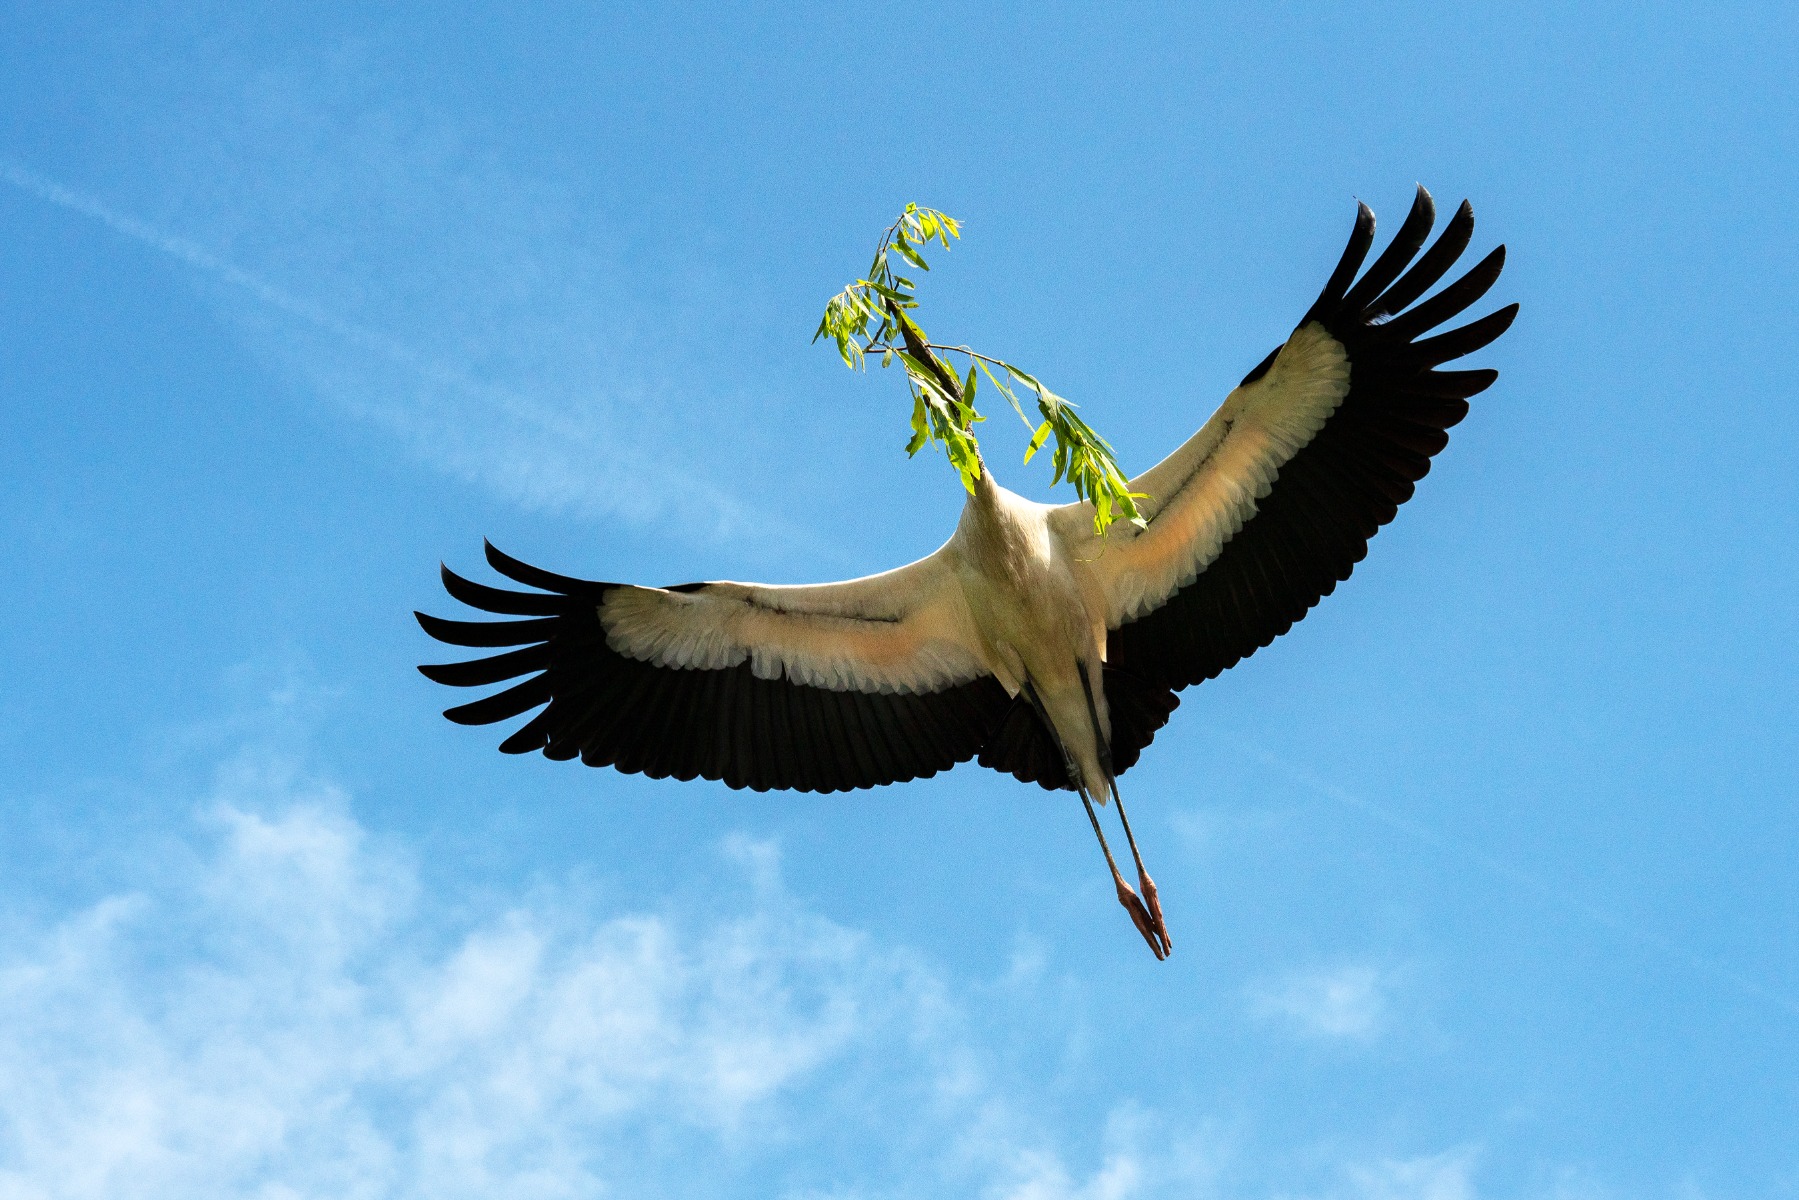
TAMRON 50-400mm F4.5-6.3 (Model A067) Focal length: 50mm Exposure: F8 Shutter Speed: 1/3200sec ISO: 400
Birds demand two quite different settings depending on what they are doing.
Perched: 1/250 to 1/500 sec. A settled bird still turns its head and shifts its grip, and at the long focal lengths birding requires, your own movement needs controlling too.
In flight: 1/1000 to 1/2000 sec, sometimes faster. Freezing a wingbeat is far more demanding than freezing the bird's overall travel, and smaller species beat their wings quickly enough that even 1/2000 will show some softness at the tips.
The opportunities are spread across the country — coastal and wetland species in the Western Cape, grassland and dam-edge birds across the Highveld, and forest species along the KwaZulu-Natal coastal belt.
The difficulty is that birds are most active around dawn and dusk, when there is least light to work with. That conflict is sharper here than in guides written for higher latitudes, because South African twilight is short: the window between usable light and darkness runs roughly twenty to twenty-five minutes rather than the extended dusk photographers further from the equator enjoy. Expect to push ISO hard during it, accept some noise, and have your settings decided before the light arrives. Our bird photography article covers fieldcraft and approach.
Freezing a decisive sporting moment
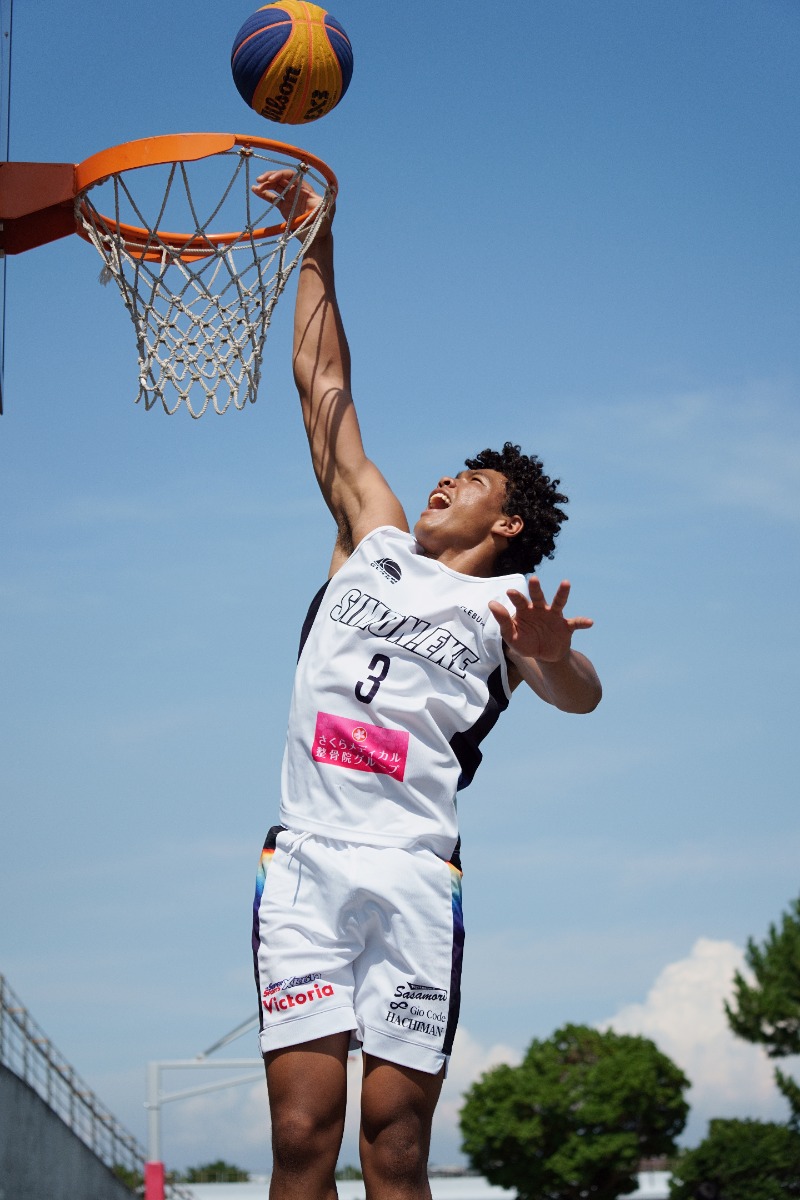
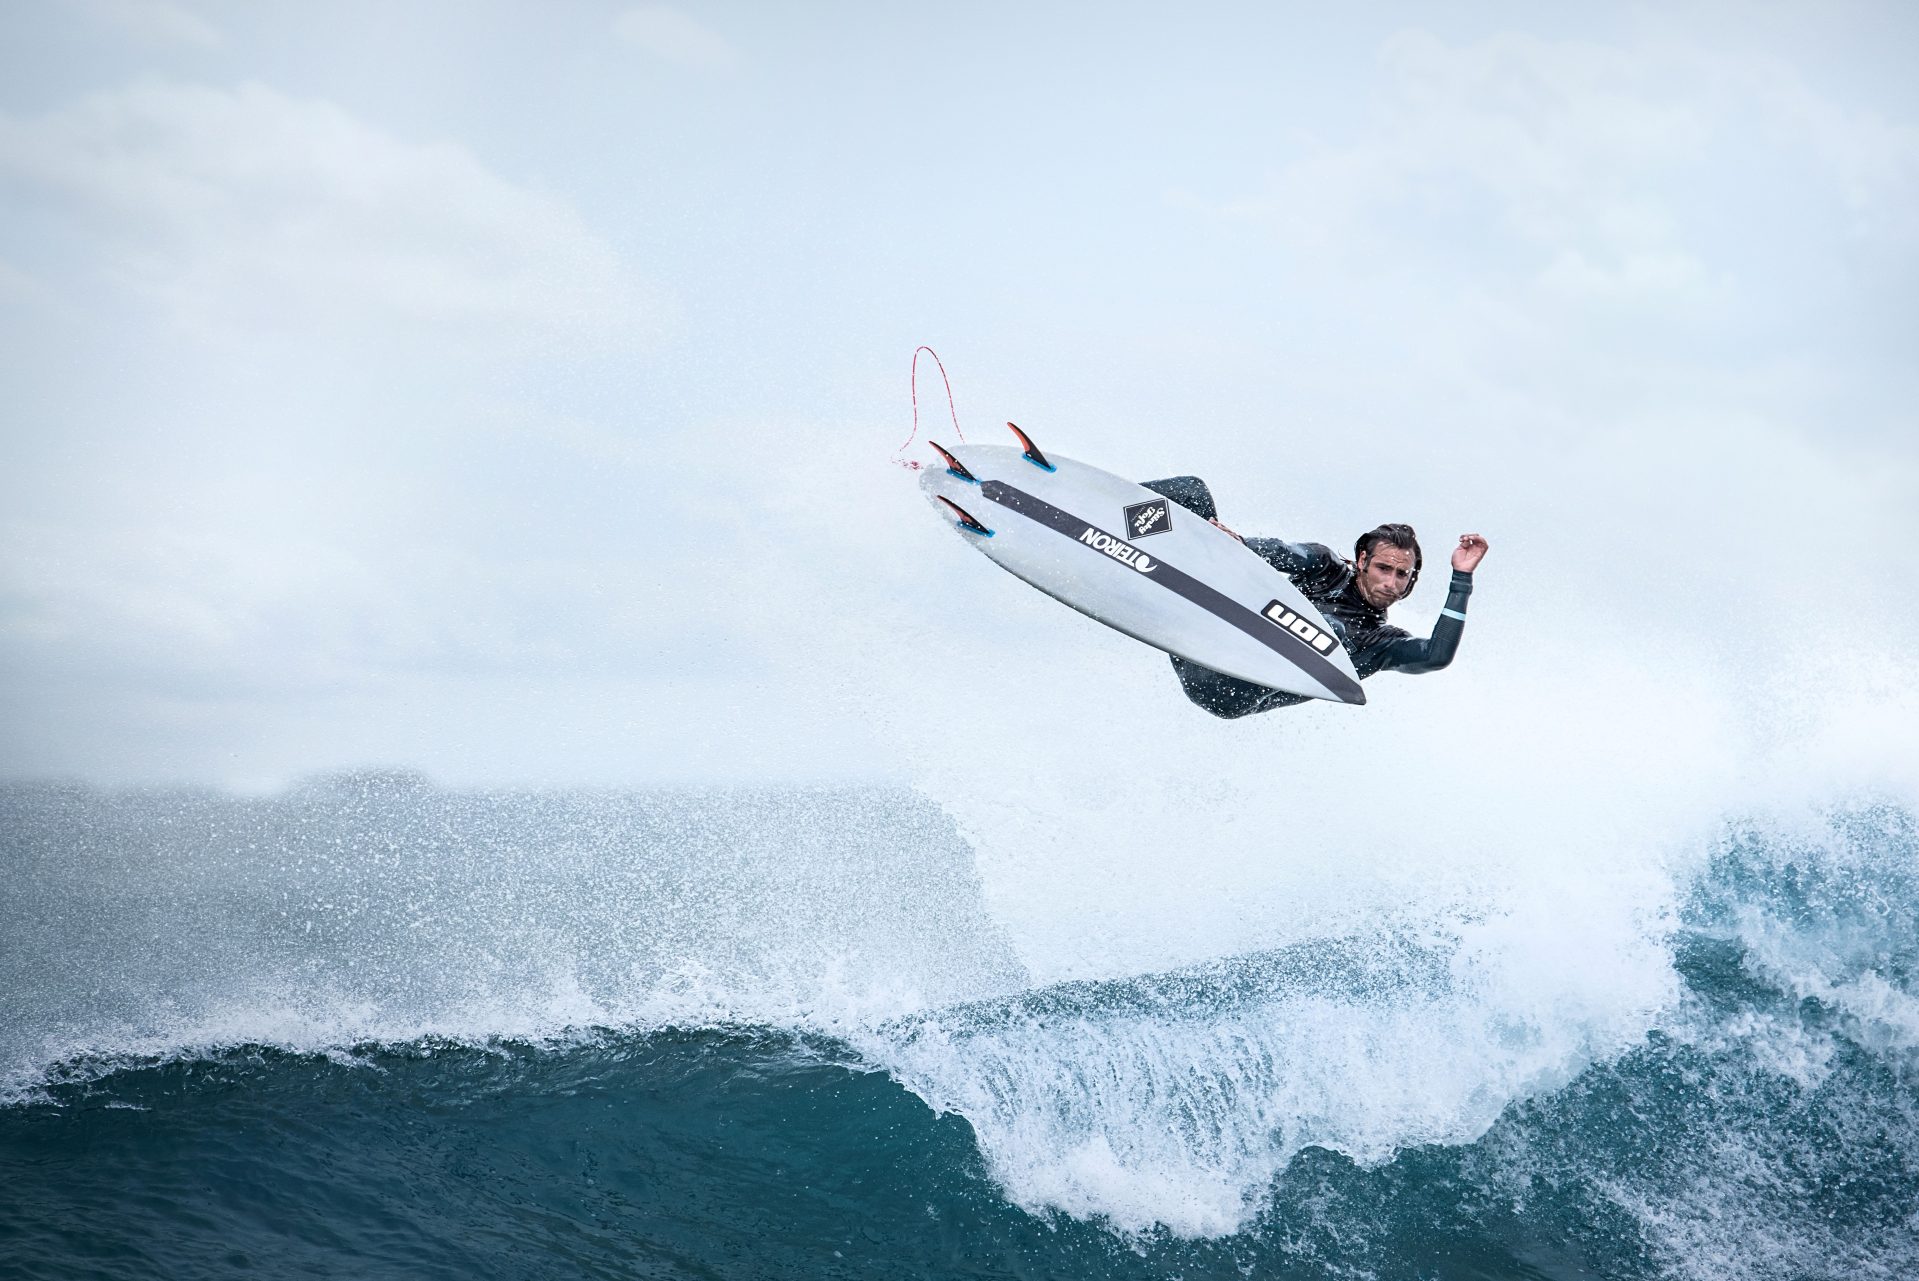
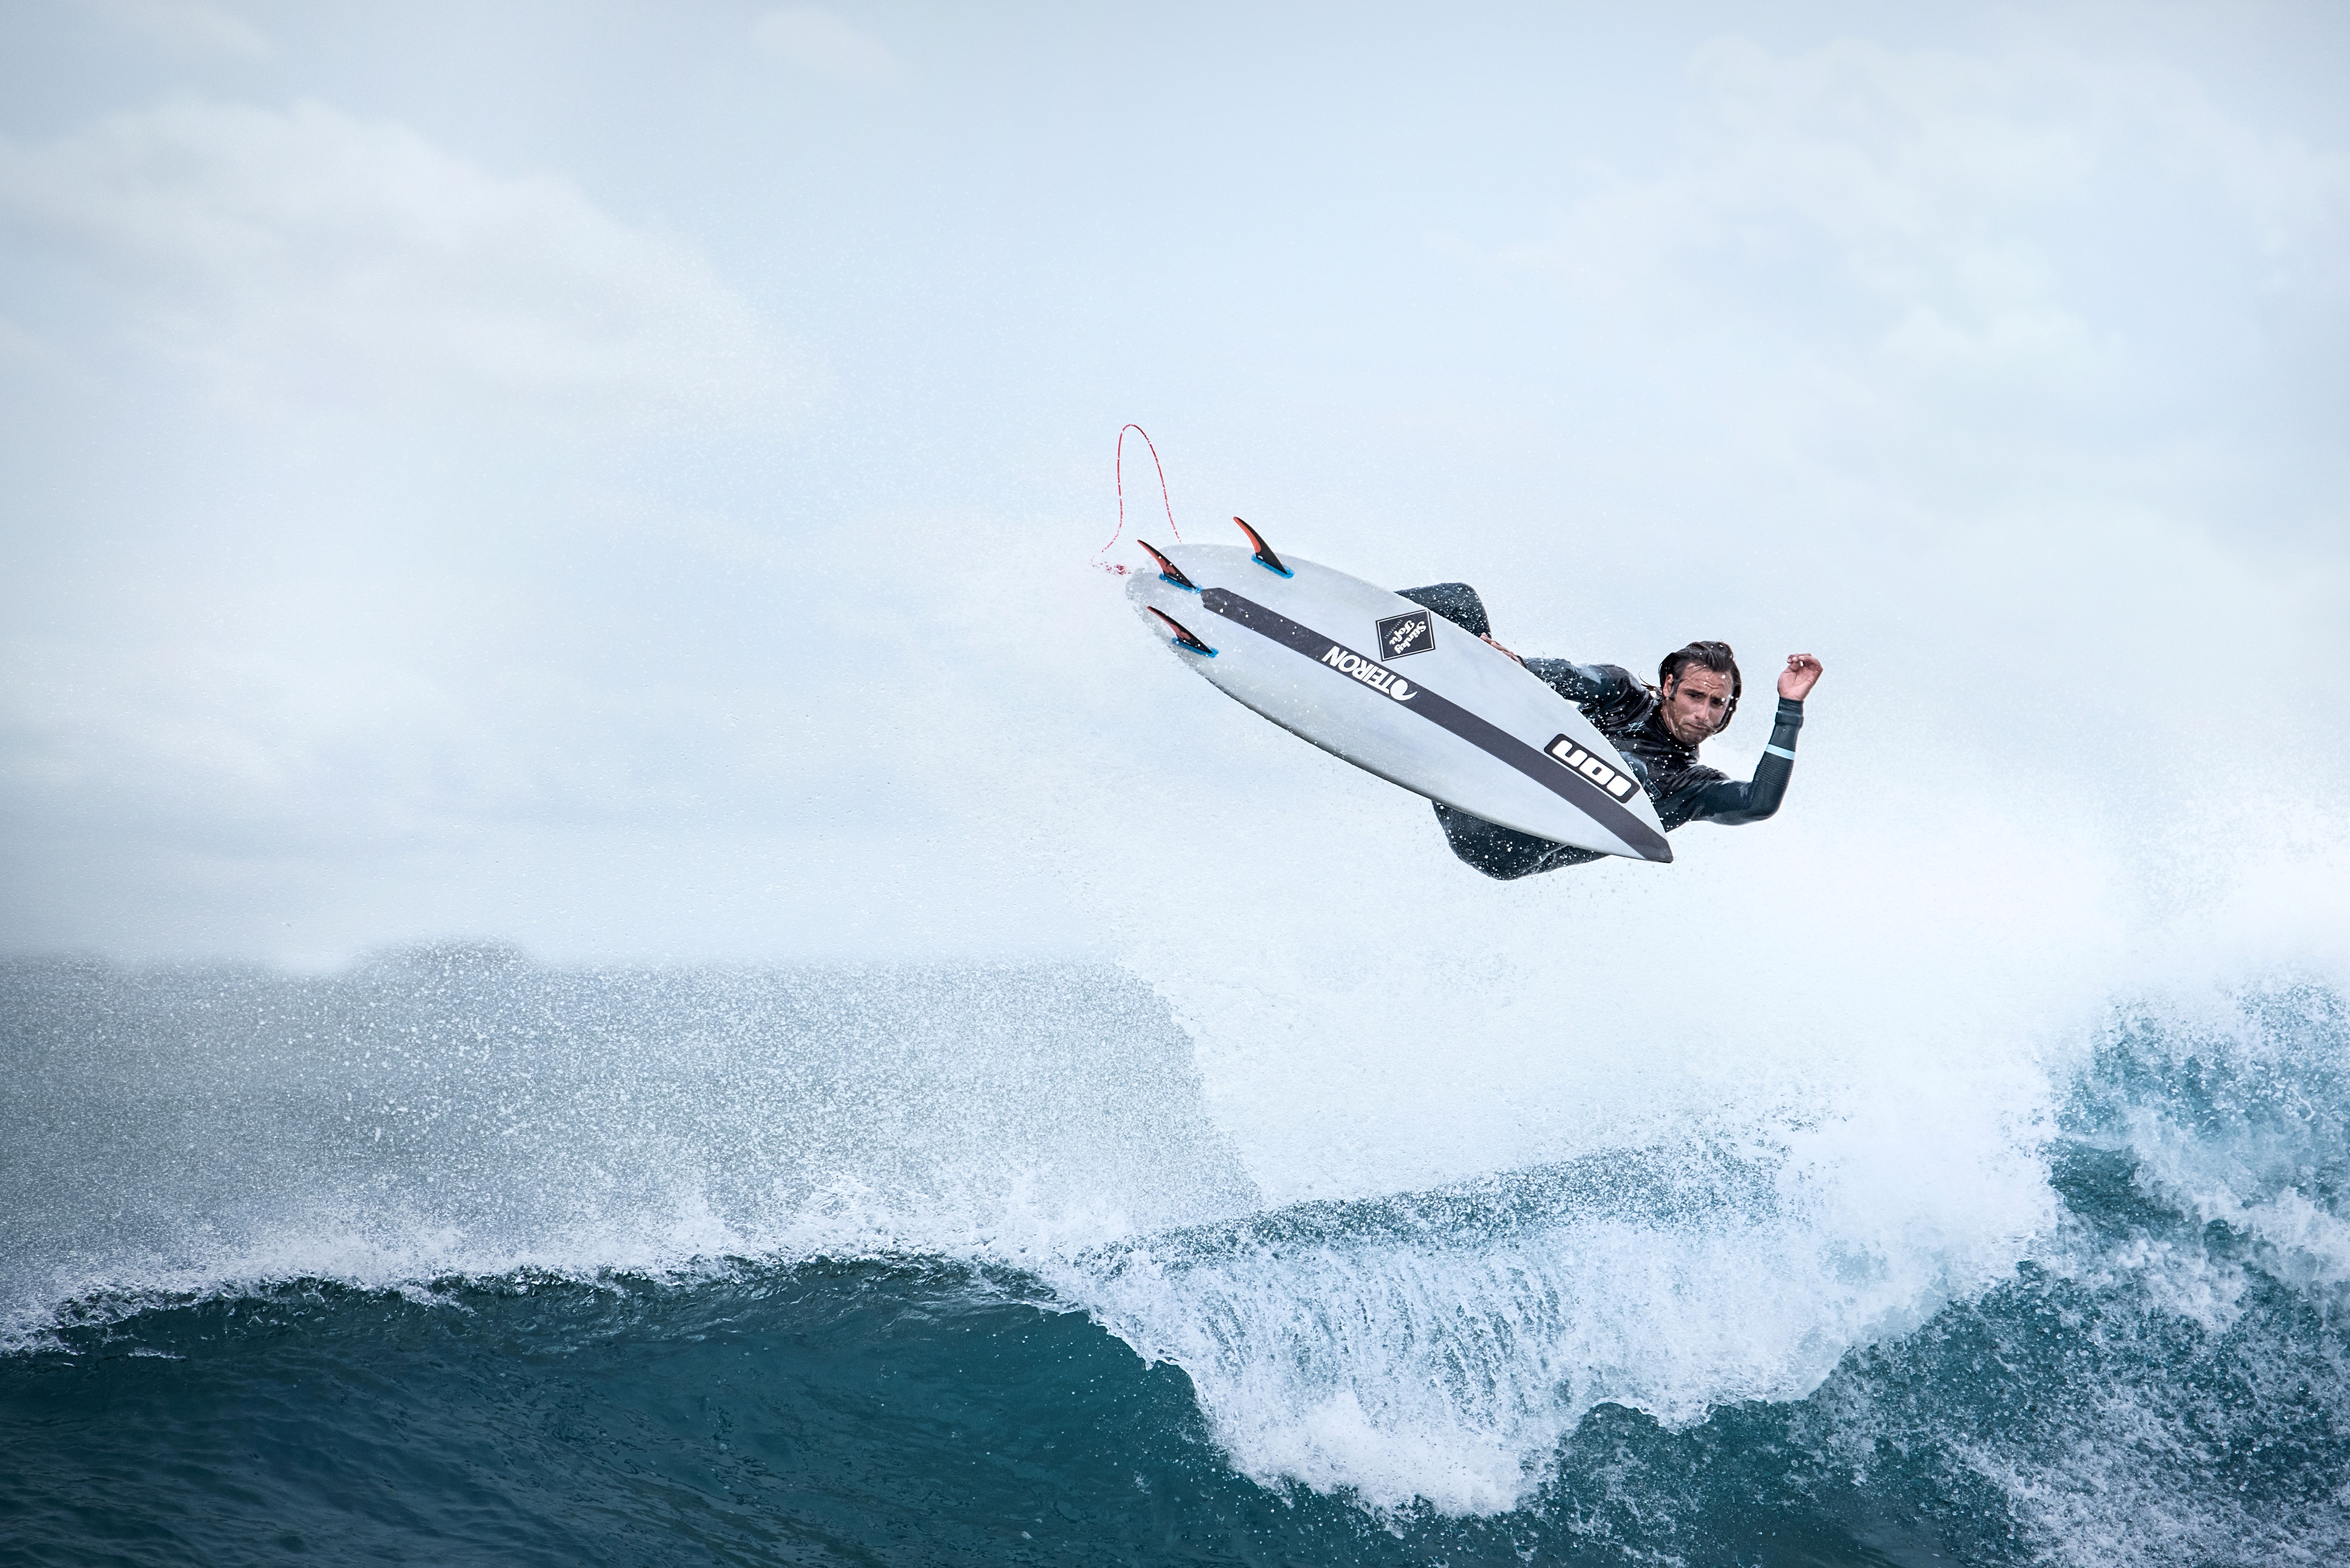
TAMRON 50-400mm F4.5-6.3 (Model A067) Focal length: 72mm Exposure: F5 Shutter Speed: 1/4000sec ISO: 640
Different sports make genuinely different demands, and a single figure for all of them is why so much amateur sports photography comes back slightly soft.
Cricket and tennis need the most speed. A ball leaving the bat or coming off a serve is travelling faster than anything else on this list, and if you want it sharp in frame you are looking at 1/2000 sec or faster. The same applies to a bowler's arm at the point of release.
Rugby is more forgiving. Running play, contact and lineout jumps all resolve well at 1/1000 sec, and dropping to that buys you a stop of light — which matters for late-afternoon fixtures in winter.
For expressions rather than action, 1/1000 is ample regardless of the sport. Faces do not move at ball speed.
Panning at 1/125 to 1/250 sec is the alternative when you want to convey speed rather than stop it. It suits cycling and running better than it suits contact sports, where the movement is less predictable. Our sports photography guide goes further into positioning and timing.
Star field on a long exposure
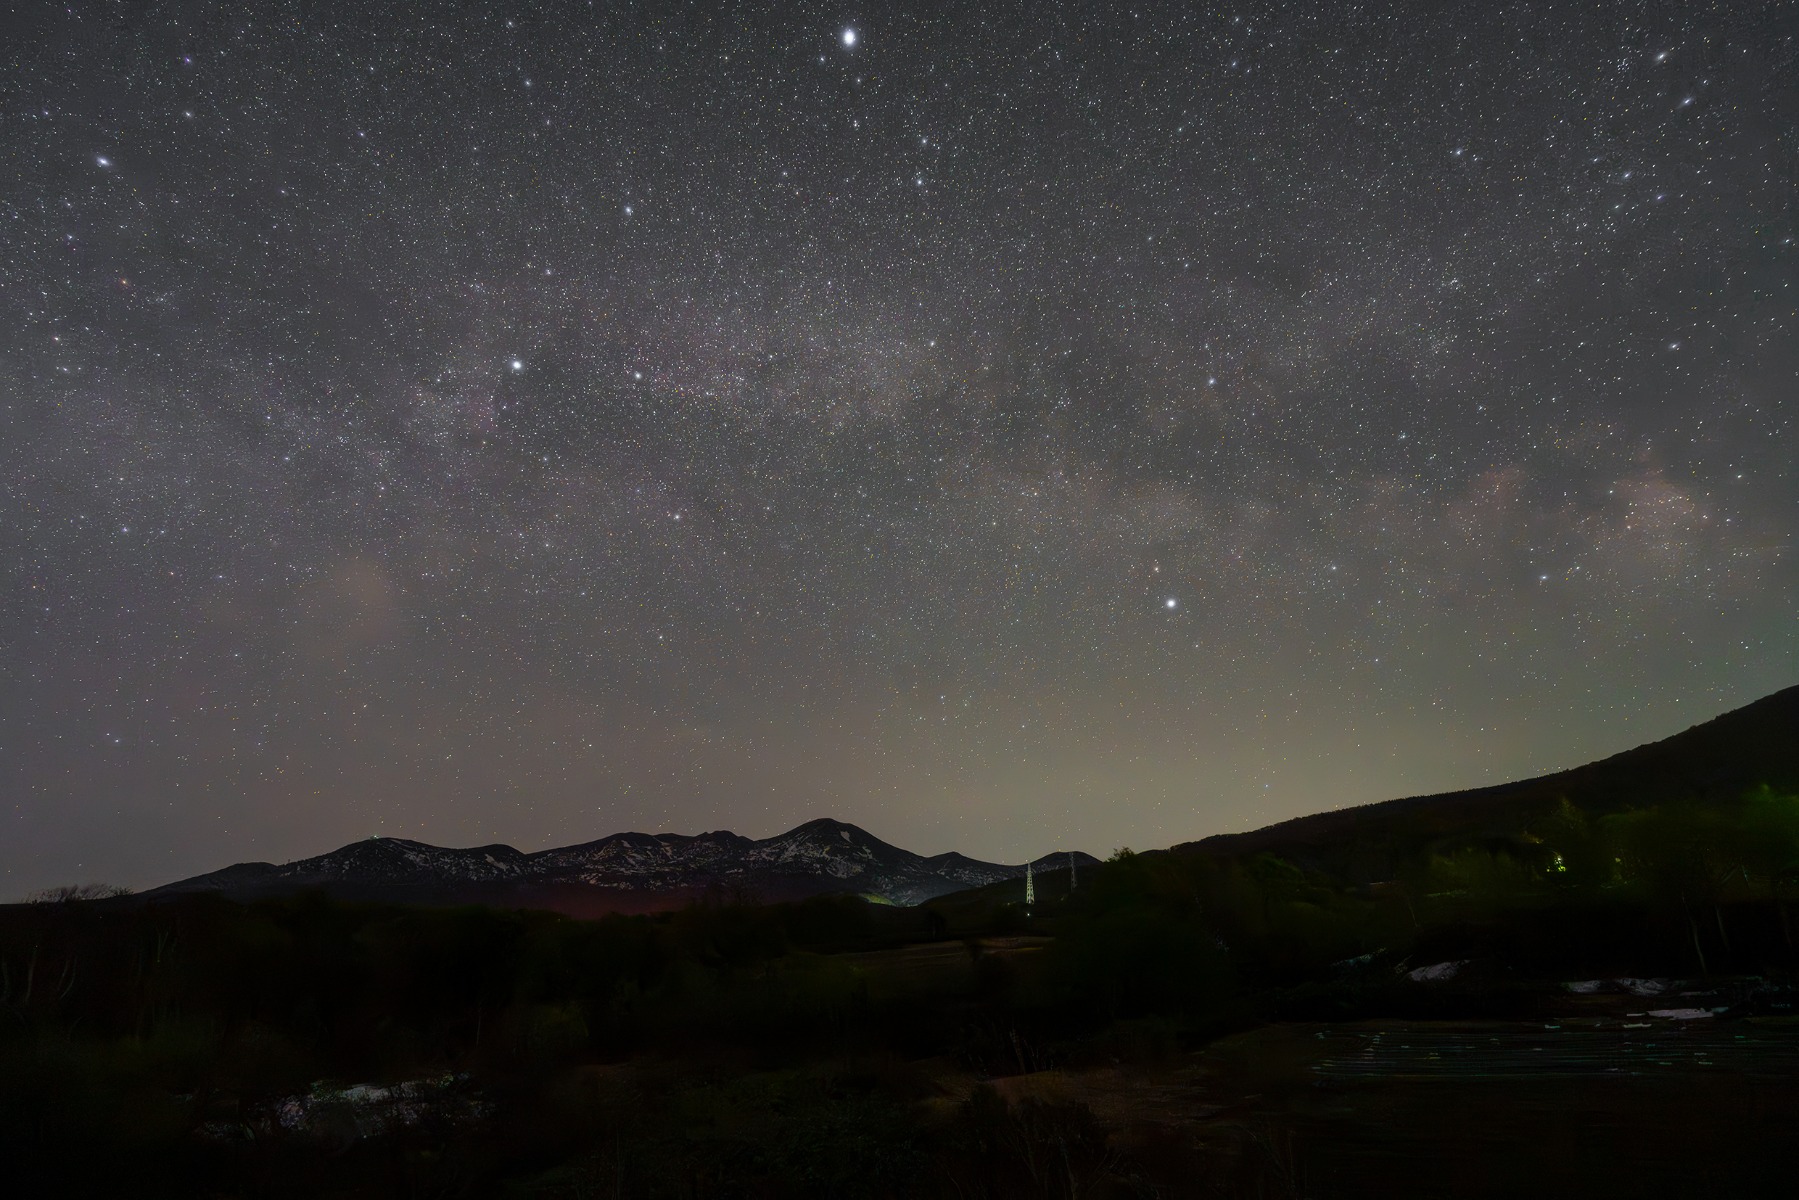
TAMRON 20-40mm F2.8 (Model A062) Focal length: 20mm Exposure: F2.8 Shutter Speed: 13sec ISO: 10000
A tripod is non-negotiable here. Beyond that, the exposure depends entirely on whether you want stars as points or as trails.
For points of light, roughly 10 to 30 seconds with a wide-angle lens. The limit is the Earth's rotation: leave the shutter open too long and the stars smear into short arcs. A rough guide is to divide 500 by your focal length to get the maximum seconds before trailing becomes visible — at 20mm, about 25 seconds.
For star trails, you want the opposite. Exposures running from fifteen minutes to several hours, usually built from many shorter frames combined afterwards using lighten blending, which stacks the bright parts of each frame while discarding the dark.
For the moon, forget everything above. A lit moon is a sunlit object and needs roughly 1/125 sec — it is one of the brightest subjects in night photography, and treating it like a star field will give you a white disc with no detail at all.
South Africa is exceptionally well placed for this. The Karoo and Northern Cape have some of the darkest accessible skies anywhere, and more importantly the galactic centre sits almost directly overhead at our latitudes during the winter months — the brightest, most structured part of the Milky Way, positioned high in the sky rather than scraping the horizon as it does for most northern-hemisphere photographers. Our night sky photography and astrophotography articles cover the planning side.
One note on the settings above: the ISO 10000 in this frame reflects a specific choice to keep the exposure short and the stars tightly pointed. Most star-point work sits considerably lower, and pushing ISO that far is a deliberate trade rather than a default.
Silky water at a slow shutter speed
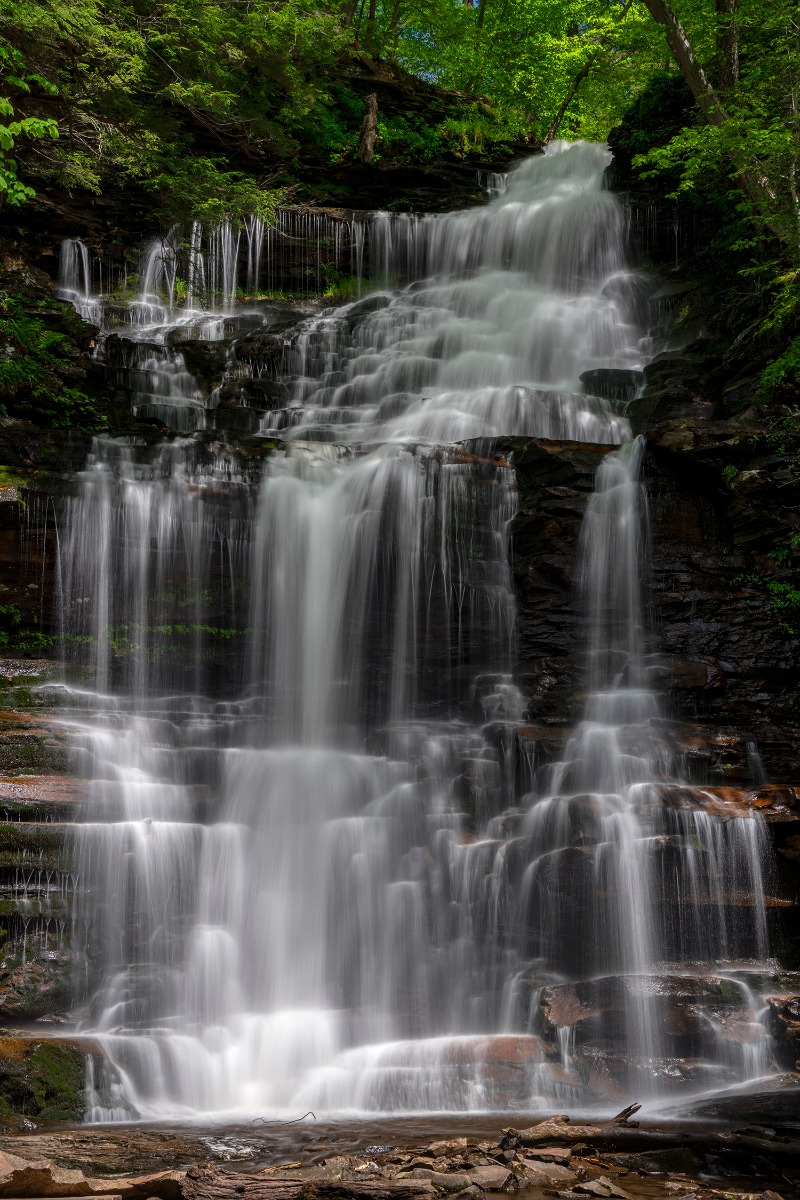
TAMRON 28-200mm F2.8-5.6 (Model A071) Focal length: 52mm Exposure: F18 Shutter Speed: 0.6sec ISO: 64
Two opposite approaches, and the choice is purely about what you want the water to look like.
To hold detail — individual droplets, the texture of spray, the shape of the falling water — use 1/500 sec or faster.
For the silk effect, where the water becomes a smooth continuous veil, use 1/2 second or slower. Longer exposures smooth it further, and somewhere past a few seconds it stops looking like water at all, which may or may not be what you want.
The practical obstacle is light. A half-second exposure in daylight will massively overexpose, even stopped fully down, so an ND filter is essential kit for this subject. A six-stop filter is a reasonable starting point.
Worth planning around the season here, which guides written elsewhere will not tell you. The Mpumalanga escarpment and the Drakensberg watercourses are fed by summer rainfall, so they run hard from roughly December through March and drop substantially by midwinter. A waterfall that photographs spectacularly in February may be a trickle in July.
Panning with a moving subject
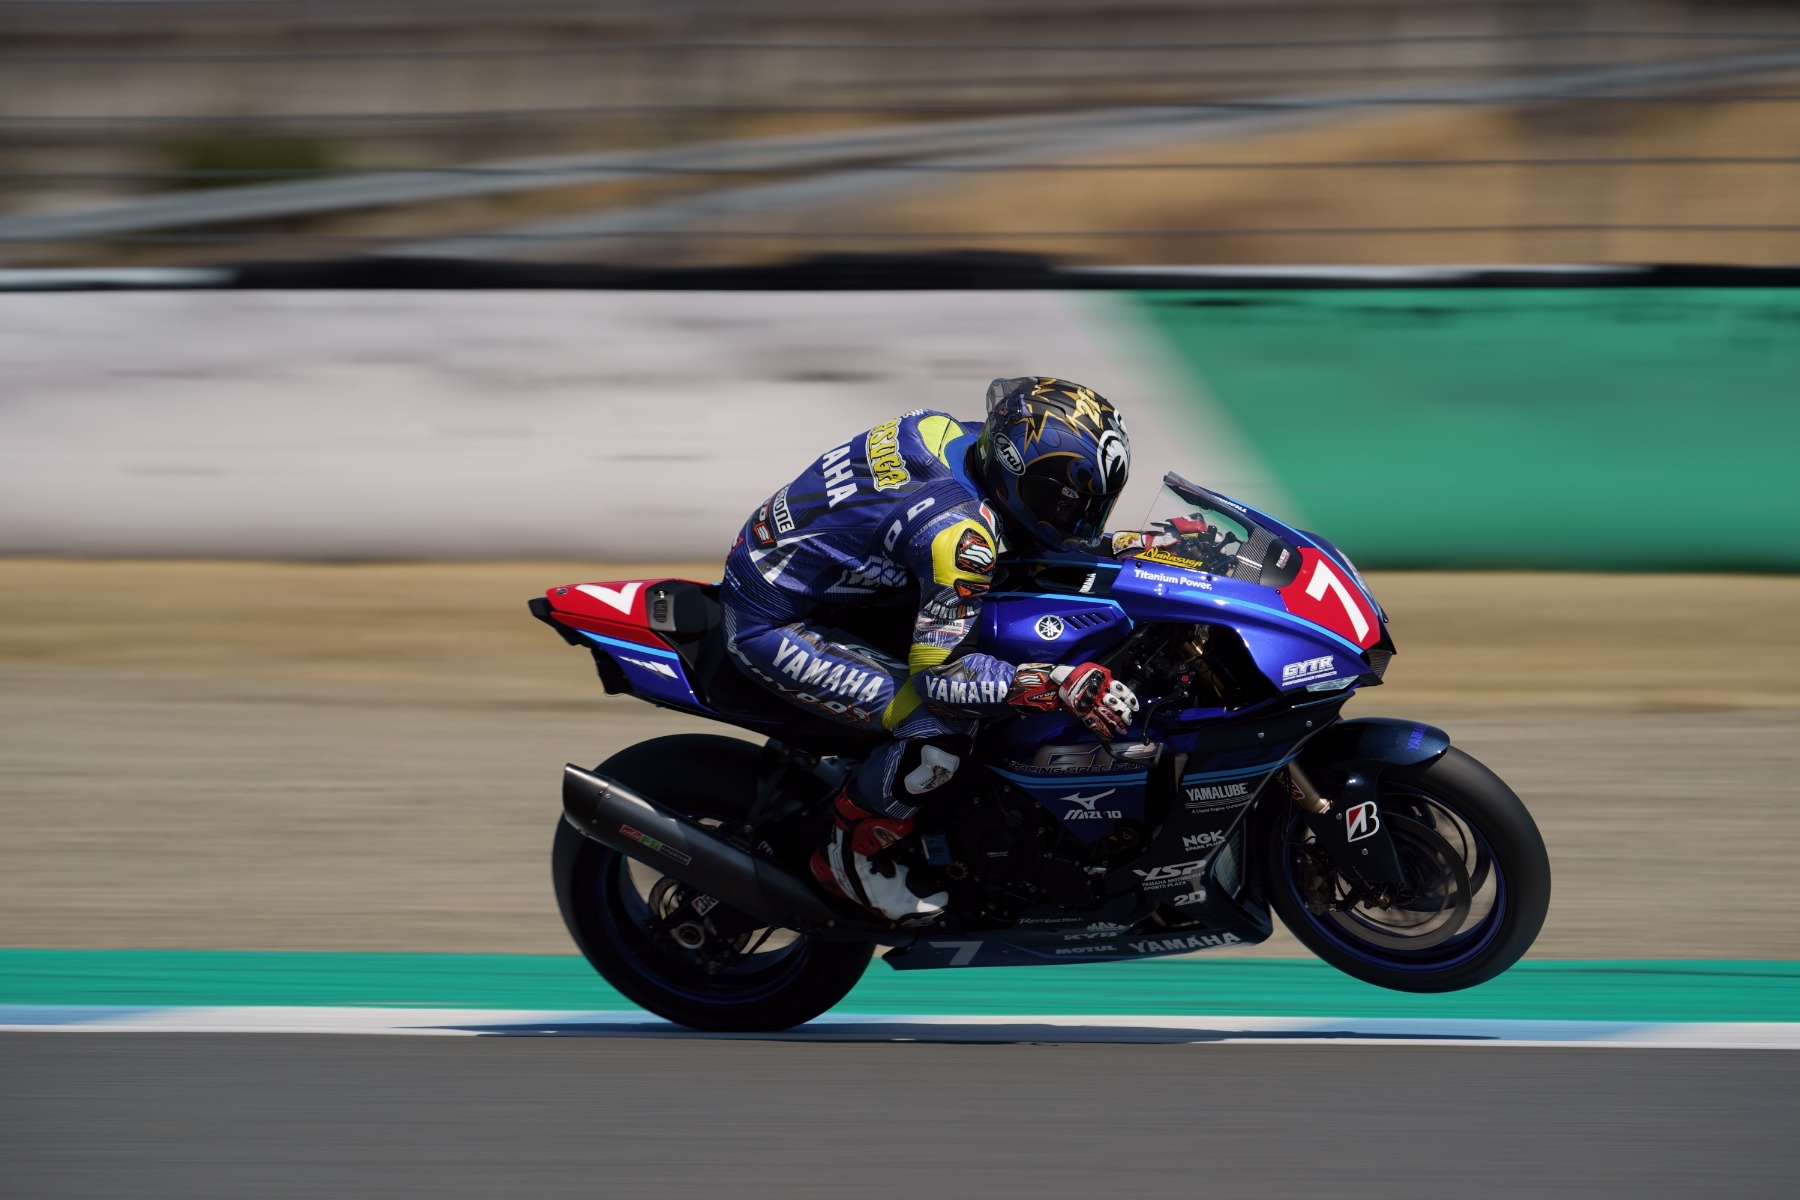
TAMRON 150-500mm F5-6.7 (Model A057) Focal length: 284mm Exposure: F8 Shutter Speed: 1/250sec ISO: 50
Panning means moving the camera with the subject during the exposure, so the subject stays relatively sharp while the background streaks into horizontal blur. It conveys speed in a way a frozen frame never can.
The shutter speed scales with how fast the subject is moving:
Pedestrians — around 1/30 sec. Runners and cyclists — around 1/60 sec. Cars and trains — 1/125 to 1/250 sec.
The principle is that a slower subject needs a slower shutter to generate enough background movement, while a faster subject generates plenty at a shutter speed that is still forgiving of your technique.
Technique is the whole difficulty, and it does not come quickly. Track the subject smoothly before you press the shutter, keep tracking through the exposure and afterwards, and rotate from the hips rather than swinging your arms. Start at the slower end of the range for your subject — a higher failure rate but more dramatic results — and expect most frames to be unusable at first. City arterials and cycling events are good places to practise, because the subjects keep coming.
Light trails turn moving vehicles into continuous ribbons of red and white, and they are among the most reliably striking results a long exposure produces.
Work between 10 and 30 seconds, starting around 15. The right figure depends on how much traffic there is and how fast it is moving — light traffic needs a longer exposure to build up enough trails, heavy traffic can fill the frame in ten seconds. City arterials near a lit precinct are the obvious location, and wet tar after a Highveld summer thunderstorm doubles every trail in the reflection beneath it.
Rear curtain sync is a refinement worth knowing. Normally a flash fires as the shutter opens; rear curtain sync fires it just before the shutter closes instead. With a moving subject, this puts the flash-frozen image at the *end* of the recorded movement rather than the beginning, so the light trail runs behind the subject in the direction it came from — which is how movement reads naturally. Fire the flash at the start and the trail appears to run ahead of the subject, which looks wrong without most people being able to say why.
Fireworks are the other classic light-trail subject and need a different figure: 4 to 8 seconds captures a shell's full arc from launch through burst to fade. Our fireworks photography article covers timing and framing in detail.
Both subjects need a tripod, and both benefit from a remote release or the self-timer, so that the act of pressing the shutter does not introduce the shake the tripod just eliminated.
Video works differently from stills, because shutter speed is tied to frame rate rather than chosen freely.
The convention is the 180-degree shutter rule: set your shutter speed to roughly double your frame rate. At 25fps that gives 1/50 sec; at 30fps, 1/60. This produces motion blur that matches what audiences are used to seeing. Far faster shutter speeds make movement look stuttery and unnatural; far slower ones smear it.
South African video work generally runs at 25fps, following the country's PAL broadcast heritage, which puts the standard shutter speed at 1/50 sec.
That figure is convenient for a second reason. South Africa runs a single national 50Hz electricity grid, which means artificial lights pulse 100 times a second. If your shutter speed is not a multiple of that pulse, you get flicker — rolling bands of brightness moving through the frame. Shutter speeds of 1/50 or 1/100 sec are flicker-safe under mains lighting anywhere in the country. Notably, 1/60 sec is not, so material shot to American conventions will band under South African lights.
This is one of the few areas where the local situation is simpler than elsewhere. There is no regional variation to account for: 25fps at 1/50 sec satisfies both the motion rule and the flicker requirement simultaneously, nationwide. Our article on interchangeable lens video covers the wider settings picture.
Shutter speed is the setting that most directly shapes what a photograph says, because it is the only one that decides how time itself appears in the frame.
Start with the figures above. They are reliable, and they will get you usable results across all ten subjects. Then start departing from them deliberately — shoot the same waterfall at 1/500 and at two seconds, the same cyclist frozen and panned, the same street scene at 1/125 and at twenty seconds. The difference between the versions is the thing worth learning, and no amount of reading substitutes for seeing it.
Do that across enough subjects and the instinct arrives on its own. Eventually you stop calculating and simply know roughly what the scene in front of you needs, which is the point at which the setting stops being a technical decision and becomes a creative one.